In my former brewing life, I had acquired some 5 gallon corny kegs, a CO2 tank, regulator, and even purchased an old fridge on ebay for $1. Here is that kegerator, circa 2005:

I left that behind when we moved up to VT in 2007. At the time of our move, I wasn't sure if I'd be brewing again, but I kept the kegs, I found out the CO2 tank was past inspection so I gave that away, but kept the regulator, and I also kept the one faucet and shank that I had for the old fridge. Since it's been a year since my brewing resurrection last summer, I opted to get back into kegging, starting with an Oktoberfest that I brewed back in April. Well... it wasn't smooth, and here is what I've learned (again):
1) Designate some time. Kegging your beer used to mean to me that conditioning was quicker. This is not true. You can get some carbonation in your beer very fast, but it lacks quality. A week is a good place to start, but I'd plan on 2 or 3 weeks, depending on the style, to reach an optimal CO2 volume.
2) Get the proper equipment - down to the right size & length of lines. It makes a difference. A big difference. Make a check list of the following:
Kegs - make sure you know if you have a pin-locks or ball-locks.
O-rings - 5 of them per keg, and make sure you have the right rings for your keg: pin-lock vs. ball-lock
Posts - These are the two pieces you'll screw onto the keg, and what you're disconnects will attach to. There are pin-lock and ball-lock types, as well as liquid and gas types. You'll need one gas and one liquid for each keg.
*A word to the wise - it seems as though pin-lock equipment is getting hard to find... if you're just starting out and are selecting these things from scratch, I would consider going the ball-lock route.
Poppets - These are the little spring-loaded pieces inside the posts, so you should get them with the posts. Their job is to open the valve when the disconnects are attached, and keep it closed when its not.
Disconnects - Again, pin-lock or ball-lock, and also gas vs. liquid... there's a difference. This attaches the proper line to the proper post.
A link for posts, poppets, and disconnects
CO tank - Choose between 5, 10, or 20 pound tanks. The initial purchase kind of sucks, but it's fairly cheap to refill. I found a 20# tank on craigslist for ~$60, got it filled for $25, and now I'm set for awhile.
Regulator - Typically, you'll want a
dual guage regulator with a shut-off valve; this regulates the amount of CO2 that goes into your beer... how it works is that you set the PSI, if fills the headspace with that precise amount, and as the beer absorbs the CO2, it lets more in.
Gas lines - Should be 5 feet of 1/4" or 5/16"... I personally use 5/16" because my regulator has a large barb ;-)
Liquid lines - depending on your set up, they should be ~5' in length, and 3/16"... some people use 1/4" too, but I don't advise it.
Taps - you can get a cheap
picnic tap or get yourself set up with a
faucet for a fridge. Lots to choose from. If you want the faucet, you'll also need a
shank, and a
tailpiece.
3) Condition at dispensing temps. Gas is more soluble in colder temps. I have my fridge set at 35 right now, but I'm thinking I'll bring it up to 40. In any case, you can use whatever temp you want, just know what it is, you'll need that number when selecting the carbing PSI (#5 below).
4) Select the volumes of CO2 that is desired. This is selected by style, here is a good chart indicating each styles range: (click on image for actual website)
5) Select the PSI to be set at. Do this by taking your temp + your volumes, and locate your PSI on this chart: (click on image for actual website)
6) Put it all together, be patient, relax, have a homebrew. Hook up your gas line to your keg, turn your CO2 tank on, set it at your selected PSI, then sit back and wait.
The Details:
So, now you have the overview, let's get into details. This involves different carbonation methods, troubleshooting, maintenance, and best practices.
Carbonation Methods:
There are really two methods, but a third one that is middle of the road.
1) Set & Forget - This is where you find your ideal PSI, (lets say 11PSI for dispensing) set it there, and let it reach an equillibrium naturally. Should take 2-3 weeks.
2) MegaBurst Carb - This uses a much higher initial pressure, let's say 30PSI, and even some gas diffusion techniques such as rocking or shaking the keg to achieve a quicker solution of the gas. If you leave this on too long, you'll over shoot your ideal CO2 volume, overcarb your beer, then you'll have to start troubleshooting.
3) Burst Carb - This is the in-between way... but really it's a burst carb done right. It's still a tricky and a little risky since you have to make an educated guess. One way is to set it at 3 x's the ideal PSI for 24 hours, then drop it down to the ideal setting, purge the headspace, and let it equalize.
Here is a helpful chart that a guy on HomebrewTalk put together: (click to go to actual page)
Troubleshooting:
Hopefully you won't encounter any problems, but if you do, here are a few troubleshooting tips that might help resolve your kegging problems.
Overcarbing - If you're beer is spitting at you, then most likely you have overcarbonated it. But that's not always the reason. The first time I had this happen, I found out that my beverage line (from the keg to the tap) was too short - at 2.5". You need the proper line resistance in order to keep the gas from breaking out of solution. Even the diameter of the line was off... I was using 1/4" line, and I ended switching to 3/16". My air line was still 5/16". So check your lines.
If you did overcarb, then you basically will need to take the air off of it, and purge the headspace a few times throughout the course of a day or so. After that, hook the line back up... you can either do 12-24 hours of high PSI then switch to regular PSI... or just set it at your ideal PSI and let it alone for a few days.
Maintenance:
more info later -
http://www.youtube.com/watch?v=xwbuqNS458c
Best Practices:
more info later -
http://www.youtube.com/watch?v=xwbuqNS458c
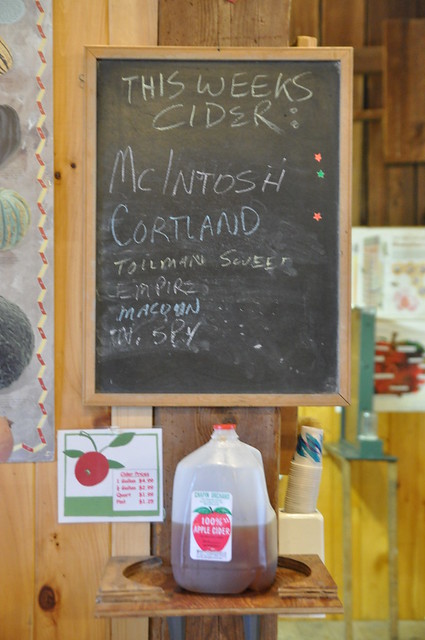 Cider season is here again! I went out to Chapin Orchard in Essex and collected 6 gallons of their latest crush - a mixture of McIntosh, Cortland, and Macoon. Apparently I missed the main hard cider crush, but whatever, I didn't have much time to go get it. Last year's cider that I made turned out great... but honestly, I'm not trying to wait 11 months to drink it. This year, I'm using some different yeast, which will hopefully leave it a little sweeter and less dry, and also am going to try and keg it quicker to enjoy over the winter. I *may* go back and grab another 5 gallons to do some tests on... I'd like to separate it into 5 - 1 gallon jugs and sweeten them with different ingredients: honey, maple syrup, brown sugar, and maybe either plain white sugar or some clear candi sugar if I get around to making some. In addition to hoping this new yeast will stop before it becomes too dry, I'm hoping that I won't have to add potassium sorbate to kill the yeast, so that I can bottle condition some of it. I have a few champagne bottles saved specifically for this.


